This is yet another DIY board gaming table, but it has a few cunning features that suited my needs really well and also make it a pretty good project for any amateur woodworker. This is the first big thing I've ever made, if you ignore that I had to build a new workbench in the first place to mount the mitre-saw it required!
Requirements
My main requirements were:
Design and Build
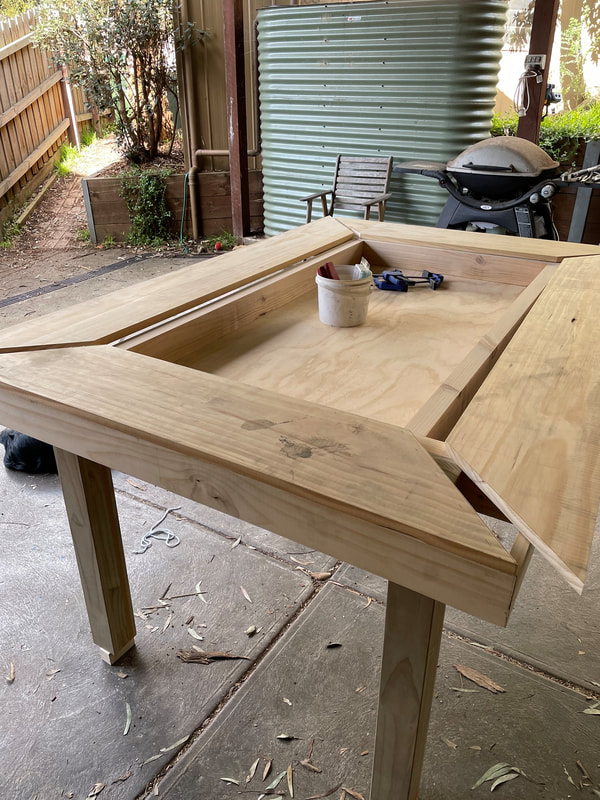
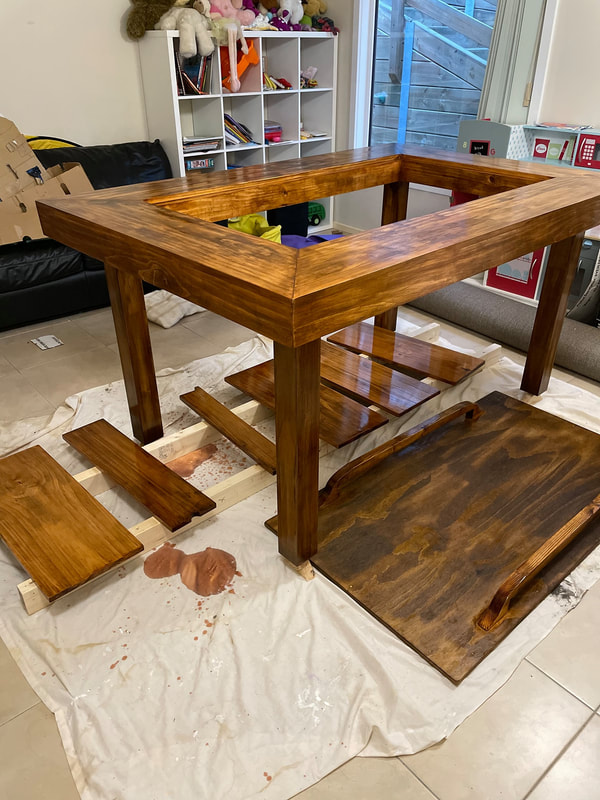
The design is based on an Octothorpe shape - that's the same shape as the hash symbol "#". That shape is not inherently rigid, but with square legs bolted into each corner, and fairly thick top and bottom boards, it becomes as stable as anything. The dimensions of the octothorpe itself can be pretty fluid if you prefer a less wide leaning ledge or a larger inner play area. And it should be self-evident, but you can easily make a square version of this design, or even an ellipse with a rectangular inner play area. (Read on first, but I discuss how to choose your dimensions later.)
My main requirements were:
- needs to be strong enough to withstand young kids who will definitely climb on it at some point.
- the sunken play area needs to be low enough to allow us to leave a game in-progress and cover it up.
- the table topper needs to be adaptable rather than a single piece of wood, so that the table can support D&D, war-games, dining (ok, with a tablecloth for safety!), and then regular games too.
- the leaning ledge needs to be wide enough to hold most individual player mats. This is a side-effect of having such a deep sunken area - I wanted to reduce how often players need to reach in, if possible.
- needs to be buildable using more-or-less stock lumber available at a local hardware store.
- requiring a mitre-saw is permissible, because I wanted to buy one anyway!
Design and Build
The design is based on an Octothorpe shape - that's the same shape as the hash symbol "#". That shape is not inherently rigid, but with square legs bolted into each corner, and fairly thick top and bottom boards, it becomes as stable as anything. The dimensions of the octothorpe itself can be pretty fluid if you prefer a less wide leaning ledge or a larger inner play area. And it should be self-evident, but you can easily make a square version of this design, or even an ellipse with a rectangular inner play area. (Read on first, but I discuss how to choose your dimensions later.)
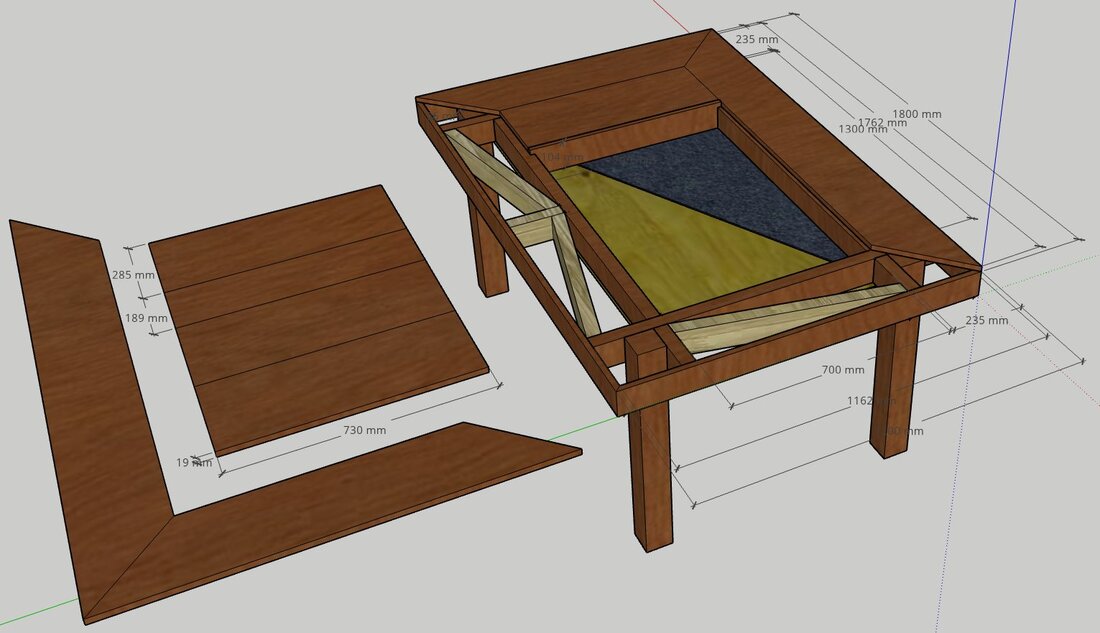
Those four main beams then have pieces cut out so they can intersect.
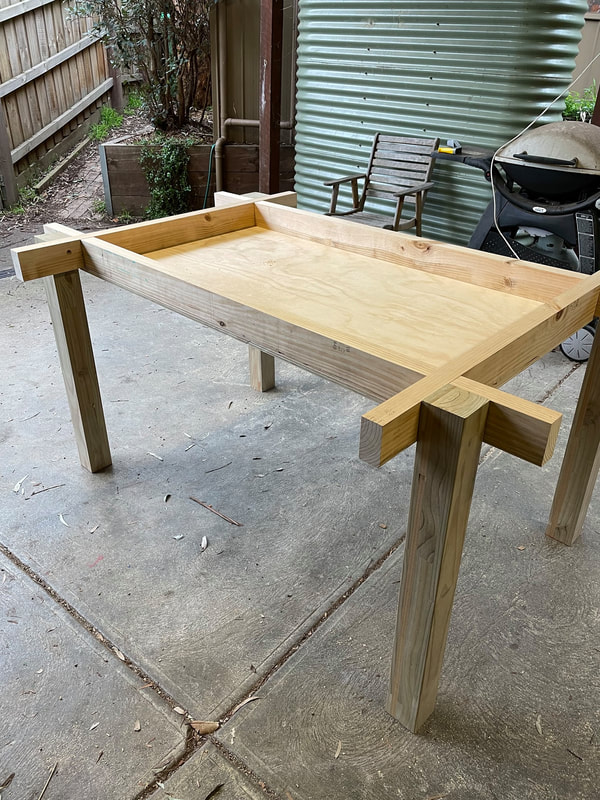
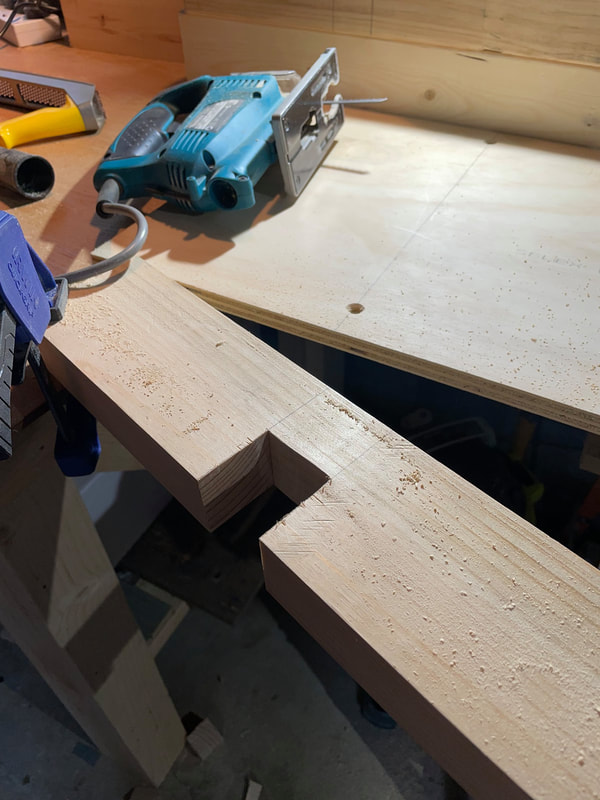
Those beams end up serving dual purpose - they're the core strength of the table, but part of their inner wall is also visible because they become the walls of the sunken play area too. A tiny part of their inner top face is also visible and becomes the surface on which the table topper boards will rest.
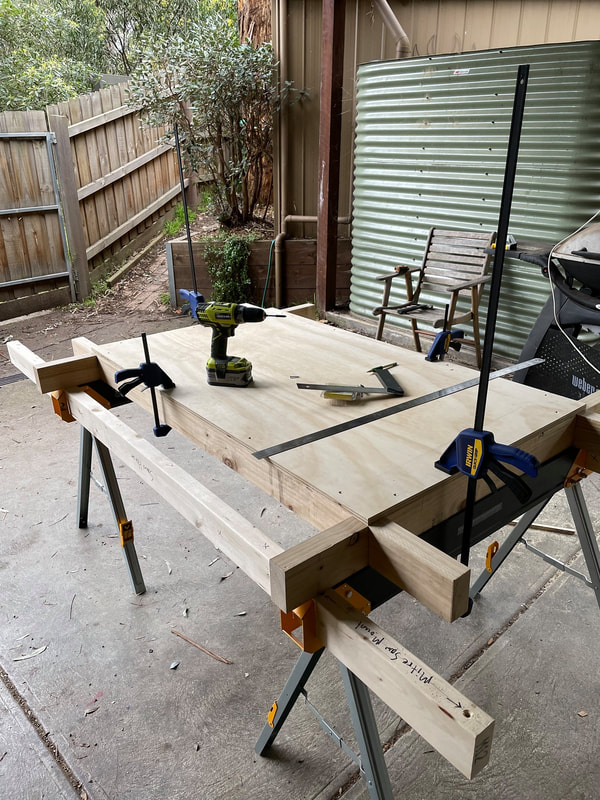
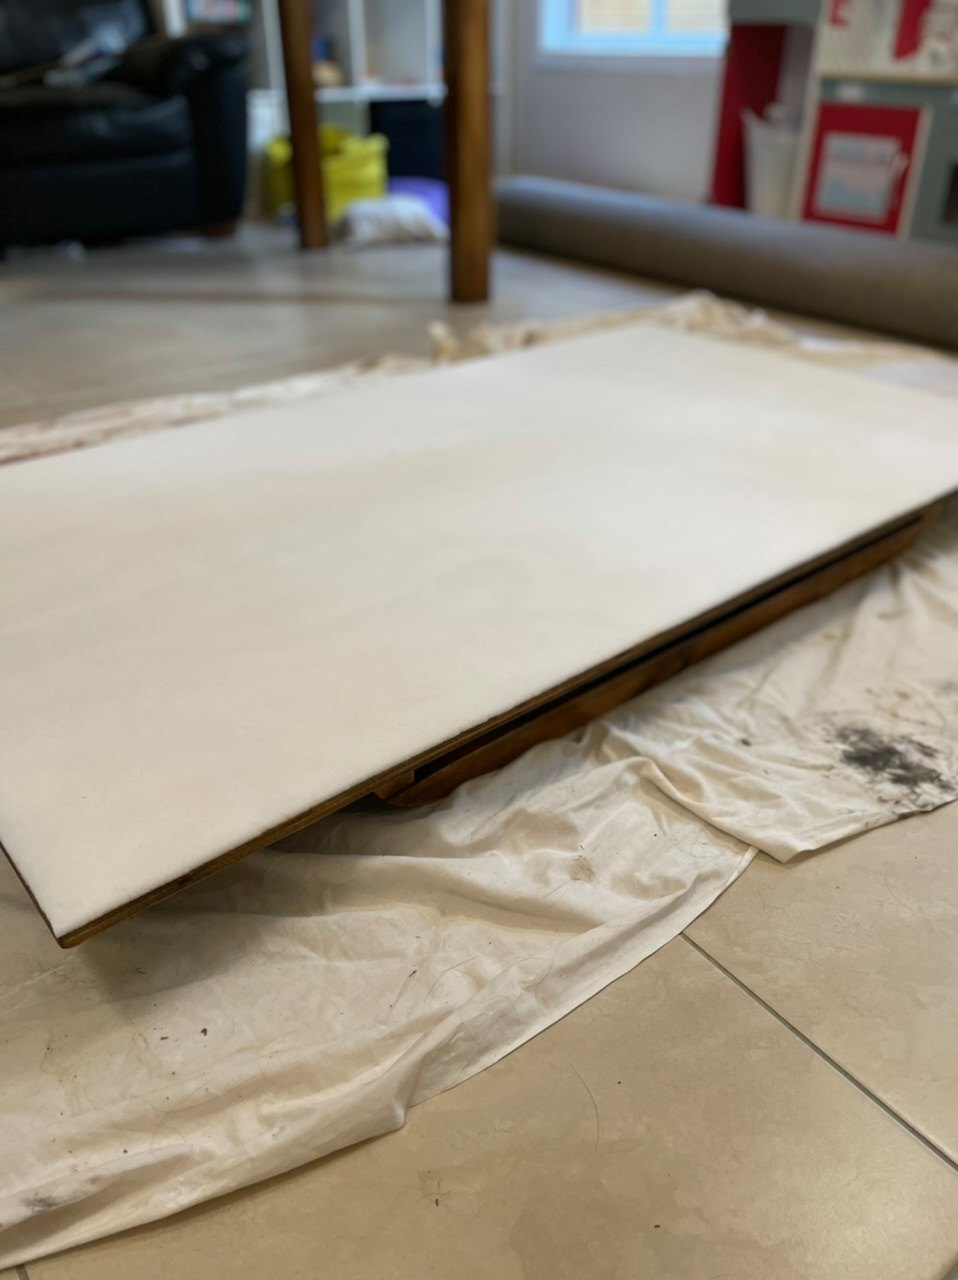
The bottom surface of the play area is just cheap plywood. I used a 15mm thick piece, which still flexes a little, but not enough to bother me. I'd suggest that should be minimum you use, and go even thicker if your play area is bigger. This plywood will never be visible from above because it will have foam and then felt/suede on top of that. It's easy to attach by just flipping over the octothorpe beams and then screwing it into them. It'll get removed again later so that the foam and felt/suede can be applied and stretched.
The bottom surface of the play area is just cheap plywood. I used a 15mm thick piece, which still flexes a little, but not enough to bother me. I'd suggest that should be minimum you use, and go even thicker if your play area is bigger. This plywood will never be visible from above because it will have foam and then felt/suede on top of that. It's easy to attach by just flipping over the octothorpe beams and then screwing it into them. It'll get removed again later so that the foam and felt/suede can be applied and stretched.
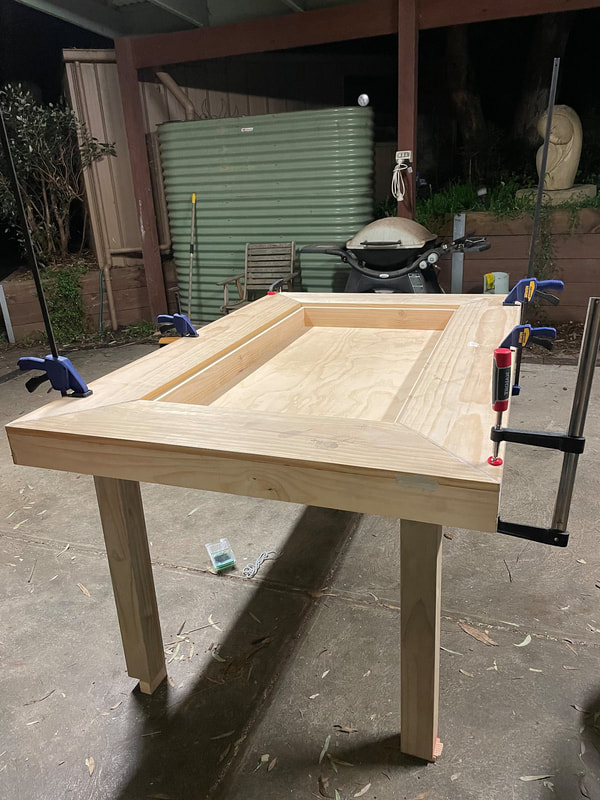
The outer walls serve to hide the beams and any fixings. They are mounted to lie flush with the upper surface of the main beams. I used metal angle brackets and screws from the inside because I wanted the outside to look flawless.
[!] For an easier approach you could just screw from the outside inwards and then put filler and stain over the screw holes. I also chose to bevel the edges of each board at 45 degrees, but for an easier approach you could just butt-join them flat.
[!] I did add an extra bracing piece of beam in the middle of the longest sides (~1300mm between the beams) of the rectangle, again with angle brackets to fix it in place. I didn't bother on the shorter sides (~700mm between the beams) and it's sturdy enough with 19mm thickness planks.

The main table surface is the leaning ledge. Here the pieces are cut at 45 degree mitres.
[!] For an easier approach, you could just cut them square instead (and for a rectangular table your pieces will probably be more similar lengths too as a result).
[!] For an easier approach, you could just cut them square instead (and for a rectangular table your pieces will probably be more similar lengths too as a result).
Again I used angle brackets and screws from the underneath.
[!] For an easier approach, screw from the top down and then fill the screw holes.
Make sure that the pieces leave a 20mm (3/4') part of the main beam's top surface visible, as this is needed for the table toppers to lie upon.
[!] For an easier approach, screw from the top down and then fill the screw holes.
Make sure that the pieces leave a 20mm (3/4') part of the main beam's top surface visible, as this is needed for the table toppers to lie upon.
All that's left now is to cut the table topper planks to size, and make the extra wall for when the table is in a half-open state.
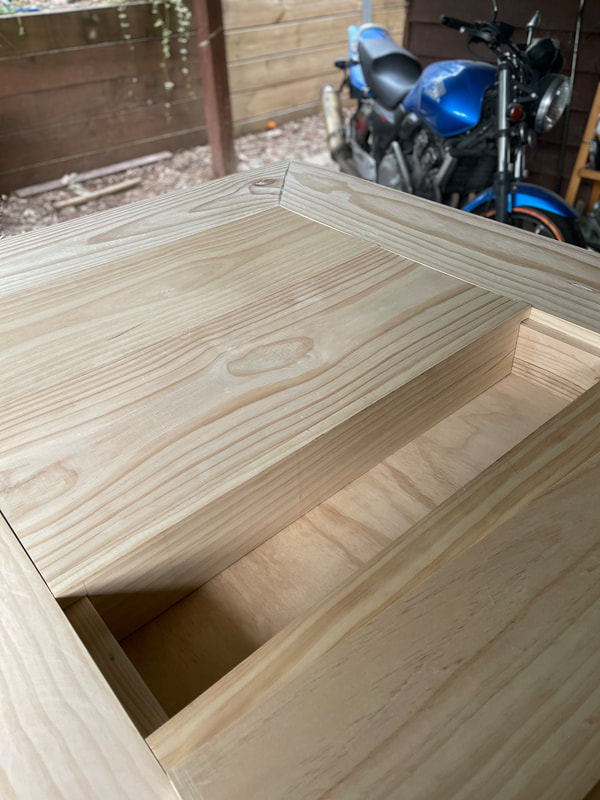
I also added a small shelf on the bottom of the play area's surface. Best to add these during the build, because you can then screw into these holders from the top of the play area downwards.
[!] I do regret not having a third piece in the centre for this shelving area. It would make sliding the boards in and out a lot easier.
[!] I do regret not having a third piece in the centre for this shelving area. It would make sliding the boards in and out a lot easier.
Finishing and Assembly
For the finishing touches I stained the wood then covered with four coats of wipe-on polyurethane. I glued a piece of thin foam to the play area surface and left it to dry. I used a spray-on glue here for convenience.
Finally I laid the suede cloth over the foam, and then raised and clamped two beams to hold the play area board in place. By carefully loosening and tightening these clamps I was able to stretch the cloth out perfectly. Then I tightened the clamps fully and screwed the play area back in again.

Setting Your Own Dimensions
If you're building your own Octothorpe Table, I suggest a trip to the hardware store to look at what size boards they have available first. This dictated a few of my dimensions because I didn't want to be resizing boards widths, just their lengths (and using mitre cuts). The thickness of the planks will also affect your vault depth and beam overlap - roughly half the thickness of your beams is ideal as long as that itself is strong enough. Again, I ended up with 19mm (3/4") thickness planks.
Next work out whether you're going for a square shape, a rectangle, or something rounded off like an ellipse. Then in order of importance, I picked out the dimensions of various parts:
Vault Depth
Since I wanted to be able to keep games set up in-progress, along with their boxes if possible, I measured all the biggest boxes we own:
I chose to use "MGP-10" pine beams for the octothorpe itself (I believe in American this is pretty much your "2x4") and that then fixed the closed depth of the play area at 90mm (3&1/2"), less a little for the foam and cloth.
Leaning Ledge Width
Play Area Width
Just listing out my working thoughts as I went through this decision:
Table Topper Planks
This is a pretty easy decision in my opinion - pick the widest boards you can get! Just do think through the total width required however, because you'll need to thin down at least one board (I used a circular saw for this). In my table there are four full-width boards and one narrower one. Coincidentally the off-cut from narrowing that one was just right to make the extra wall piece too.
Costs, Difficulty, and Final Thoughts
In the end I spent nearly AUD$400 on the wood and the same again on materials like glue, stains, sealant, fixings, suede cloth, and foam. But I also bought a compound sliding mitre saw, orbital sander, shop vacuum, and lots of clamps too. And uh... don't let my wife know, but I spent more on tools than the whole table cost! All that said, a comparable table from a boutique place near me costs around AUD$4,000 so this is still less than half of that with tools included, and less than a fifth if they're not.
I'm not a complete amateur - I am a mechatronic engineer by training, and I'd built a workbench just prior to this - but this was my first big woodworking project. I think this is achievable for anyone with a moderate understanding of the tools and finishing steps required, but all of that knowledge can be gained online. I chose to learn a bit of SketchUp when designing this, but in the end found hand calculating the dimensions on the fly was easier than trying to tweak the 3D CAD. Maybe a parametric CAD program would have been a better choice since so many dimensions are dependent on previous ones.
Overall, there definitely are easier and cheaper designs shown on Board Game Geek. But in my not-so-humble opinion, if you want something that's in the middle ground of professionalism and cost, and whose dimensions are easily varied to suit your specific needs, then the Octothorpe is a pretty good choice. Best of luck, and may all your rolls be crits!
If you're building your own Octothorpe Table, I suggest a trip to the hardware store to look at what size boards they have available first. This dictated a few of my dimensions because I didn't want to be resizing boards widths, just their lengths (and using mitre cuts). The thickness of the planks will also affect your vault depth and beam overlap - roughly half the thickness of your beams is ideal as long as that itself is strong enough. Again, I ended up with 19mm (3/4") thickness planks.
Next work out whether you're going for a square shape, a rectangle, or something rounded off like an ellipse. Then in order of importance, I picked out the dimensions of various parts:
Vault Depth
Since I wanted to be able to keep games set up in-progress, along with their boxes if possible, I measured all the biggest boxes we own:
- Standard-ish boxes are 75mm deep. (Quacks, Galaxy Truckers, etc)
- Stone Age - 95mm, Clank - 90mm, Dominion - 80mm
- Hogwarts Battle - 105mm
- Gloomhaven JOTL - 120mm, miniatures are 50mm high. Squished down is 105mm.
- Santorini Board - 44mm, and a full tower with dome is 69mm. So would need to reserve 120mm. Box is just 62mm.
- The foam and mat reduce the vault usable height by 5mm or so. But the table planks are the same as the leaning ledge, and increase the total vault height by 19mm. Thus the vault depth is ~14mm more than the wall height (but holds about 85mm when closed).
- Definitely want to be able to keep complex games set up, but it's acceptable to not be able to leave the box there too.
- Maybe the available size of the walls should determine this?
- Due to the cross-over slot cuts, the deeper the better in terms of retaining strength in the beams.
- CHOICE: 90mm beams, by 45mm if possible, else 30mm. Need 2x length and 2x width of table. Vault depth is therefore 104mm open and 85mm closed.
I chose to use "MGP-10" pine beams for the octothorpe itself (I believe in American this is pretty much your "2x4") and that then fixed the closed depth of the play area at 90mm (3&1/2"), less a little for the foam and cloth.
Leaning Ledge Width
- If possible we want players to have space to hold their player boards or a set of cards and tokens.
- The largest player boards we have are Galaxy Trucker at 210h x 305w
- Stone Age: 170h x 250w
- Quacks: 240h x 330w bounding-box but weirdly shaped
- CHOICE: 235mm x 19mm planks available (plus 15mm overlap of beam underneath)
Play Area Width
Just listing out my working thoughts as I went through this decision:
- The largest board we have is Ticket to Ride at 790x525. This felt cramped with a play area that was 650 wide (we tested on the dining table using masking tape).
- Stone Age: 600x420
- Hogwarts Battle: 590x435
- Our Dining Table is 1800x1050
- Most advice online is to go between 900 to 1200, but this doesn't account for having almost a whole foot of personal leaning area too.
- Saw a 1400x1400mm table with 250mm leaning ledge online recently. That gives 3' table area. They also sell a 1150mm wide table with 250mm leaning area, so a 650mm play area width.
- Maybe the available lengths of planks should determine this? (In my case it didn't, because they would have sold me a 6m length if I had the truck to carry the damn thing!)
[!] Another tip - if you can find a lumber yard that'll cut down their longer planks to the lengths you need directly, that's worth paying for IMHO. - CHOICE: Use 1.2m sides to yield 700mm play area width (and 1.8m long-sides to give 1300mm length)
- One more thought - if the leaning ledge is permitted to overlap the outer table walls, this could increase the available play area size. But unless that's like 20mm overlap at most, there's going to be a temptation to lift from the leaning ledge rather than from the frame. With zero overlap this problem is eliminated.
Table Topper Planks
This is a pretty easy decision in my opinion - pick the widest boards you can get! Just do think through the total width required however, because you'll need to thin down at least one board (I used a circular saw for this). In my table there are four full-width boards and one narrower one. Coincidentally the off-cut from narrowing that one was just right to make the extra wall piece too.
Costs, Difficulty, and Final Thoughts
In the end I spent nearly AUD$400 on the wood and the same again on materials like glue, stains, sealant, fixings, suede cloth, and foam. But I also bought a compound sliding mitre saw, orbital sander, shop vacuum, and lots of clamps too. And uh... don't let my wife know, but I spent more on tools than the whole table cost! All that said, a comparable table from a boutique place near me costs around AUD$4,000 so this is still less than half of that with tools included, and less than a fifth if they're not.
I'm not a complete amateur - I am a mechatronic engineer by training, and I'd built a workbench just prior to this - but this was my first big woodworking project. I think this is achievable for anyone with a moderate understanding of the tools and finishing steps required, but all of that knowledge can be gained online. I chose to learn a bit of SketchUp when designing this, but in the end found hand calculating the dimensions on the fly was easier than trying to tweak the 3D CAD. Maybe a parametric CAD program would have been a better choice since so many dimensions are dependent on previous ones.
Overall, there definitely are easier and cheaper designs shown on Board Game Geek. But in my not-so-humble opinion, if you want something that's in the middle ground of professionalism and cost, and whose dimensions are easily varied to suit your specific needs, then the Octothorpe is a pretty good choice. Best of luck, and may all your rolls be crits!
 RSS Feed