DrTomAllen.com
tom@jugglethis.net
  • Dr Tom
  • Now
  • Consulting
    • Testimonials
  • Robotics
    • Publications & Videos
  • Startups
    • Cubescape
    • Triple Point Robotics
  • Game Design
    • Bounces
    • Dodgy Wiring
    • Half the Battle
    • Road to Nowhere
    • Summon the Swarm
    • Evil Robots
    • Spelled
  • Blog

MakeyMakey media keys

5/2/2014

 
Picture of a MakeyMakey circuit board
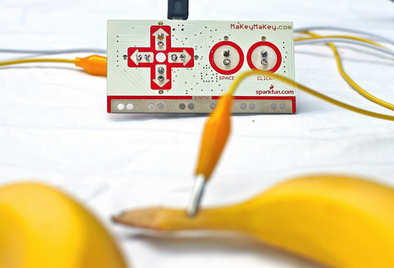
I've had a vague plan to augment my coffee table with some media centre controls for a while now, but when my brother's partner bought two MakeyMakeys for my son I uh... "borrowed" one for myself. Today I finally kicked off this project by re-mapping the inputs to keys I wanted it to trigger, but hit a difficulty with non-standard media keys for volume control.

Essentially, the MakeyMakey presents itself as a USB HID device - like a keyboard/mouse combo - and you then hook up anything conductive to an input, and use that to complete a circuit through to ground which then triggers a key or mouse movement. My plan is to have some coins or brass discs embossed into the surface of the table, and use these as attractive (and toddler-proof, since there will be no moving parts) keys.

Unfortunately, under the hood the MakeyMakey is essentially an Arduino board, and the HID implementation is designed to help Arduino's target market - not embedded software engineers. One irritating feature is that they want users to be able to easily say something like sendKey( 'a' ) rather than sendKey( 0x61 ), and in their infinite wisdom they've managed to implement this in such a way that you actually cannot send anything other than an ASCII character or modifier key. Great, we can signal to our typewriters to reset their carriage feed, but not send a volume up command because typewriters only have two volume settings anyway; 'loud' and 'obsolete'. I swear that joke was more funny before I wrote it down.

At any rate, for my first ever Arduino program, I've gone in and edited the core library to workaround this. This commit shows the necessary changes to the MakeyMakey code, but the additions may well be helpful for any other Arduino based projects that require HID device work.

Get your Deriving License here!

30/4/2013

 
I wrote my first open source ruby gem today. It's a pretty simple idea - supply a Gemfile or Gemspec and the gem tries to determine which license each included library falls under, and thus whether you have any requirements you must abide by with your own project. Here's an example output:
>> deriving_license ~/Code/rails_sample_app/Gemfile
Determining license for rails:
Trying from_gem_specification strategy...FAILED
Trying from_scraping_homepage strategy...SUCCESS
Determining license for adt:
Trying from_gem_specification strategy...FAILED
Trying from_scraping_homepage strategy...FAILED
Trying from_license_file strategy...CUSTOM
Determining license for app_constants:
Trying from_gem_specification strategy...FAILED
Trying from_scraping_homepage strategy...SUCCESS
Determining license for bcrypt-ruby:
Trying from_gem_specification strategy...FAILED
Trying from_scraping_homepage strategy...FAILED
Trying from_license_file strategy...CUSTOM

...
    
Detected 4 known licenses:
MIT: Expat License (14 instances)[http://directory.fsf.org/wiki/License:Expat]
Ruby: Ruby License (6 instances)[http://www.ruby-lang.org/en/about/license.txt]
BSD: FreeBSD Copyright (2 instances)[http://www.freebsd.org/copyright/freebsd-license.html]
GPL: GNU General Public License (2 instances)[http://en.wikipedia.org/wiki/GNU_General_Public_License]
The following dependencies have custom licenses: adt, bcrypt-ruby, bootstrap-sass, rack-protection, sqlite3
You can grab it from https://rubygems.org/gems/deriving_license or just by running 'gem install deriving_license'. Let me know if it's useful to you, and feel free to fix it up and submit a pull-request!

IMUCam, a.k.a. a quick and dirty Oculus Rift

17/9/2012

 
This is a quick demo showing how you can use a $100 inertial measurement unit and a light weight laptop as a rough version of the Oculus Rift VR headset. A friend and I have a game idea we wish to build for the Rift but since units won't start coming until around December, and neither of us ordered one (since we didn't have the idea during the Kickstarter campaign), this is our "close enough" workaround.
Sample code for driving a Unity3D camera using an IMU is available on my GitHub page. [edit: 02/07/2013, now updated for the TinkerForge protocol 2.0]

The Magic Torch, Part One

29/8/2012

 
Picture
Yesterday I finally received my inertial measurement unit (IMU). This is a tiny unit containing a gyroscope, accelerometer, and magnetometer. The gyroscope measures angular rotational velocities - how fast the unit is rotating around three axes. The accelerometer measures the accelerations along each axis - how fast the unit's speed is changing along each axis. The magnetometer measures the effect of prevailing magnetic fields on the unit - assuming the magnetic fields around the unit are non-changing, this provides a coarse measure of the unit's orientation.

All of this information is mashed together in a Kalman Filter (more specifically, Seb Madgwick's implementation of Rob Mahony's Direction Cosine Matrix (DCM) filter.) This filter integrates the gyroscopic information to determine orientation, and minimises error via feedback from the double-integration of the accelerations and the magnetometer information. This page at TinkerForge describes the IMU unit in detail, and the underlying equations can be found in Madgwick, S. O., An efficient orientation filter for inertial and inertial/magnetic sensor arrays, University of Bristol, April 2010. Overall, and especially considering it costs less than $100, this unit is awesome!

This particular IMU is actually built around a 32bit ARM processor, which does all the filter calculations onboard and processes USB commands to access the API. You simply run a daemon on your PC which translates TCP/IP commands to USB, and this then allows the manufacturer to have very simple APIs in a variety of languages, since they all just talk TCP/IP. Personally, I'm using Python because this project also makes heavy use of OpenCV which has Python bindings.

Ok, so what am I doing with it?

Picture
Well, first up, I stuck it to a laser projector. With tape.
Picture
Then I wrote some Python code to rotate and translate the image given the IMU's readings for orientation. In the image above, I'm taking my laptop's camera as the input image. I record a base orientation and then measure differences compared to this. The image gets rotated by the opposite of the change in roll. It gets moved left or right by the change in yaw, divided by the horizontal field of view angle, multiplied by the projector's horizontal number of pixels. Likewise, it's moved up or down by the change in pitch, divided by the vertical field of view angle, multiplied by the projector's vertical number of pixels.

For those readers who've not done IMU to sensor frame transformations before, this is one of the dodgiest hacks known to mankind. Despite this, it kinda sorta works.
Picture
This picture was awkward to take: My laptop is filming me. The projector is drawing the output on my wall. And I'm struggling to take the photo with my phone.

You know what - I'll just make a video... Stay tuned for part two! :-)
    This blog is very seldom updated. Having kids will do that.
    ​

    Archives

    October 2022
    August 2021
    October 2019
    June 2019
    February 2016
    July 2015
    July 2014
    June 2014
    February 2014
    October 2013
    September 2013
    May 2013
    April 2013
    March 2013
    November 2012
    September 2012
    August 2012
    June 2012
    May 2012

    Categories

    All
    Coffee
    Hacking
    Programming
    Projects
    Rants
    Robots
    Startups
    Thoughts

    RSS Feed